Free shipping on USA orders over $129!
Picture study is one of the easiest things to add to your schoolwork and one of the most enriching. Let’s walk through how to do it.
What You Will Need
You will need to select an artist and have a good-sized picture by that artist for your picture study lesson.
How To Do a Picture Study
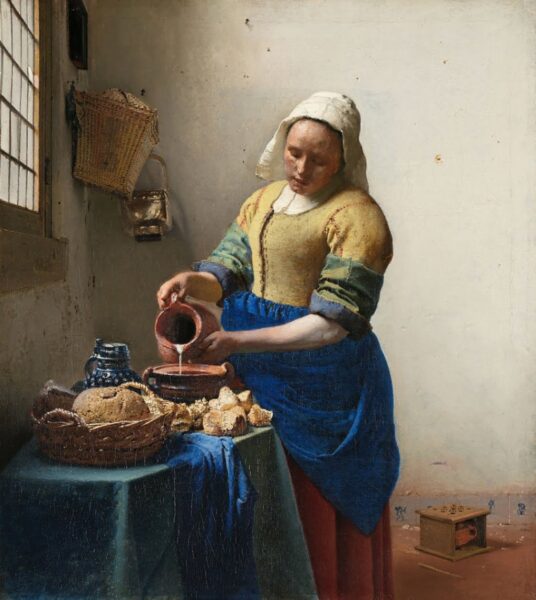
All right, let’s do a picture study, and then we’ll walk through the steps we used. For this picture study, we’ll use The Milkmaid by Johannes Vermeer. Ready?
Look at the picture until you can close your eyes and see it in detail. If one part is a bit fuzzy, open your eyes and look at that part again. Take as long as you need.
Now, describe the picture without looking. Try to start big and then work your way down to the details. Go ahead. Pause here and try to describe it aloud.
When you’re done with your description, look at the picture again to clarify or confirm any parts that you were uncertain about or couldn’t remember clearly. In this picture we gaze upon a servant carefully pouring milk from a pitcher into a ceramic vessel. The richly colored apron she is wearing was, ironically, very costly to paint, because Vermeer used the rare mineral ultramarine to achieve its deep blue color.
Along the floor you can see a row of wall tiles. These are decorated blue and white and are traditional Delftware, famously manufactured in Vermeer’s hometown of Delft. The square object in front of these tiles is a small foot-warmer, which would be filled with coals and placed near one’s feet for warmth in the drafty homes that lacked our modern heating systems.
What other details do you notice in this picture? Look at all the different textures that Vermeer painted in this scene: the glass and wood of the window, two baskets with two different weaving patterns, the cloth on the table and on the milkmaid, her skin, the plaster on the wall, the shiny lantern, the bread.
There you go. That’s a picture study. Now let’s talk through what we did.
Step 1: Look at the picture
Encourage your child to look at the picture until he can close his eyes and see it clearly in his imagination with every detail in place. The larger the picture, the easier it is to see the details. I like to have at least an 8.5- x 11-inch print, if possible.
Step 2: Hide and describe the picture
Turn the picture over and ask the child to describe it to you. If needed, help him start with the big picture and then move to the details. You can do that by simply saying something like, “Tell me about the whole picture first. It’s a picture of . . . .” If you are working with several children, you can ask each one to describe a different part of the picture in turn.
Step 3: Look again and discuss
After the picture has been described, look at it again. This is the time to clarify or confirm any details that may have been uncertain or missed. You can also use this time to guide more in-depth observation (as we did with the textures) or to add some information about the picture that can’t be gathered just from looking at it (like the Delftware tiles or the cost of the blue paint).
Step 4: Put it on display
After you have studied the picture, put it on display for the rest of the week. Try to display it where your child can see it easily, so he can look at it as much as desired over the coming days.
Do picture study just once a week. It takes only five or ten minutes. So next week, choose another picture by the same artist and go through the same steps: look, hide and describe, look again and discuss, put it on display. You want to linger with one artist for a full term, 12 weeks. Over the course of the 12 weeks you want to cover about six to eight works by that artist. That will give your child a good feel for that artist’s style.
Now, if you’re studying only six or eight works by that artist, what do you do during the other weeks of the term? Well, that’s where you can level up or down.
Level Up or Down
Most of you will not need to level down, because children of all ages enjoy looking at a picture and describing it. I level it down for my special needs daughter who struggles with verbal communication. When we do a picture study, we look at the picture; I tell her the name; and I might point out one or two aspects that I think will be interesting to her. I invite her to tell me something about the picture, but I don’t require it, because that pressure just makes her brain shut down. So we mainly look, then put it on display.
During those extra weeks, you could do a little review that also encourages mental and verbal growth. So do three pictures, then take a week to play this game. Lay the three pictures out, face up, and describe one of them. See if your child can identify which picture you are describing by the clues you give. You can customize how difficult or easy those clues are. After your chosen picture has been guessed, then let your child take a turn, if she is able. She can select one of the other two pictures and give you a clue (or hopefully more) about which one it is, so you can guess.
Most of you, though, will be using those four to six extra weeks during the term to level up. Do that by reading a living biography about the artist. You can break it into sections, if you would like, and read just one section each week, asking for a narration. (If you aren’t sure how to do narration, take a look at the How to Do Narration post.)
You can also ask the older children (probably grades 7 and up) to draw a little sketch or diagram of one of the paintings, showing each element of that picture and where it goes. Don’t ask your child to try to duplicate the painting, just see if he can sketch out all the elements in their proper places. Even a diagram with stick figures and arrows and labels would work for this.
Then, near the end of the term, after you feel like you know that artist’s work and life more personally, you can enter him into your Book of Centuries.
Picture Study is one of the easiest lessons to add to your week: look, hide and describe, look again, discuss, put it on display. If you want picture studies all ready to go, check out our Picture Study Portfolios. The portfolios make it so simple to do picture study, because everything you need is right there. Each portfolio includes eight beautiful reproductions of works by one artist, interesting discussion points, and a biography and picture and Book of Centuries dates for the artist. It’s truly grab and go.
So now that you know how simple it is to do, why not choose an artist and do a picture study next week?
Podcast: Play in new window | Download
Podcast (podcastv): Play in new window | Download
Can I ask for help ? My 9 yo son hates picture study. When I tell him to look at the picture, he just look at it for a few seconds and tell me he is done. He said “there’s a woman, pouring milk, yellow dress, blue apron, done.” If I encouraged him to look more, or paying attention to interesting detail, he just said “I don’t know,” and so bored with picture study. What to do with this situation ?
That is a tough situation, Susan, and it is hard to give an answer without knowing your son personally. A few thoughts come to mind that might help you think through some possibilities.
First, I’m curious what other visual stimulation he experiences in a typical day. If he is used to pictures that move every couple of seconds, his brain might be conditioned to lose interest in a still picture after a few seconds. So you might take a look at how much exposure he has to moving images on a screen.
Another possibility might be that he isn’t interested in the subject matter. If you know what he’s interested in, you might be able to use that knowledge as you select pictures and as you present them. For example, if he is interested in the ocean and sailing, you might do Winslow Homer’s pictures of the Atlantic and the Caribbean. If he’s interested in nature, do Constable. Don’t give up trying various genres. It reminds me of Charlotte Mason’s description of a little boy who was uninterested in music study, until one day the teacher played a Wagner piece and the boy suddenly lit up. You don’t have to allow your son’s tastes to dictate all of your selections, but keeping them in mind might help smooth the way a bit.
Then you might present picture study as helpful to him. For example, if he is interested in scientific facts, you might study some Leonardo da Vinci sketches and discuss how his attention to detail in those sketches helped him in his studies. You could present picture study as an opportunity to practice the skill of observing closely and carefully. If your son is interested in car motors, mention how different cars look different under their hoods and he needs to develop the skill of looking closely and carefully to notice and know where everything is in its place. You could incorporate into your picture studies sometimes giving him a sheet of paper and seeing how many elements of the picture he can sketch in their correct places without looking back. It’s not a drawing challenge; it’s an observation challenge. It’s not about how well he can draw them; it’s about how many elements he can remember and put in their correct places.
Just a few ideas that, hopefully, will help you think of even more ideas to try. Don’t give up!