Free shipping on USA orders over $129!
I want to introduce to you a wonderful tool that Charlotte Mason used to help her students see where everything fit in history. It’s called a Book of Centuries.
What You Will Need
A Book of Centuries is basically a timeline in a book. Every two-page spread covers one hundred years—a century—that’s why it’s called a Book of Centuries.
So you will need a notebook with every two-page spread labeled with one century, going in chronological order. That means, the B.C. pages will count down and the A.D. pages will count up. Keep that in mind.
You can download a free printable Book of Centuries template. Simply print those pages, three-hole punch them, and put them in a binder. Then you’ll be all set to start using your own Book of Centuries.
How To Do a Book of Centuries
Back when I began homeschooling, I started with a timeline on the wall. And it soon took over my house! So when I heard about a Book of Centuries, I thought, “Brilliant!” But I didn’t understand just how brilliant it is until we started using it. Here’s what you do.
Every time you read about a person or an event, flip open your Book of Centuries to that page and enter that person’s or event’s name. You can also jot down a few words to remind you of why that name is significant.
Now, after a little while, when you open the book to add someone new, you will also see the other people and events that you have already studied. Then you start to make connections: “Oh! I didn’t realize that Abraham Lincoln lived at the same time as Tchaikovsky.” or “Charlotte Mason lived when the Sherlock Holmes stories were first published!”
Don’t restrict your Book of Centuries entries to just your formal history studies. Enter artists that you cover in picture study and musicians from music studies. Enter poets and scientists and favorite authors. You can even enter favorite books that are set in a particular time period.
That simple exercise of entering each one into your Book of Centuries will help pull together the wide variety of subjects that you’re studying. But the best part is that you won’t have to tell your student how to connect those dots or try to manipulate those connections; the Book of Centuries will help him make the connections for himself—his own discovery. And when the student makes those connections for himself, that’s when it sticks. It’s a brilliant method.
Leveling Up or Down
There are several ways of leveling up or down as you use a Book of Centuries.
An easy way to level down is to keep a family Book of Centuries. I usually recommend this if you have young students. Keep one book and make your entries together. If your students want to add drawings or try to write a particular favorite name, that’s fine. But until their handwriting and reading are well established, you can be the main person making the entries. That takes the pressure off the students; plus, as they watch you make the entries, they can see how to use a Book of Centuries and get in the habit of making regular entries.
Here’s a tip with young students especially: when you first start using a family Book of Centuries, open it up and enter your family members’ birthdays in it. That will give your children a point of reference as you start entering other people who have lived in the past.
When a student is ready, you can level up to giving him his own Book of Centuries to keep for himself. I like to wait until that student’s handwriting and reading are well established. This is going to be a lifelong keepsake and a valuable tool for him to grow in self-education.
Encourage him to make entries regularly that reflect what he is learning about.
Another way to level up is to add more structure to your Book of Centuries. You start with blank pages, but as you level up, you can introduce some elements that add more organization and guidance for your older students. Those elements are included in the more deluxe version called My Book of Centuries. So when your student is ready for his or her own Book of Centuries, that version is a great choice. Let me show you the ways that you can level up in it.
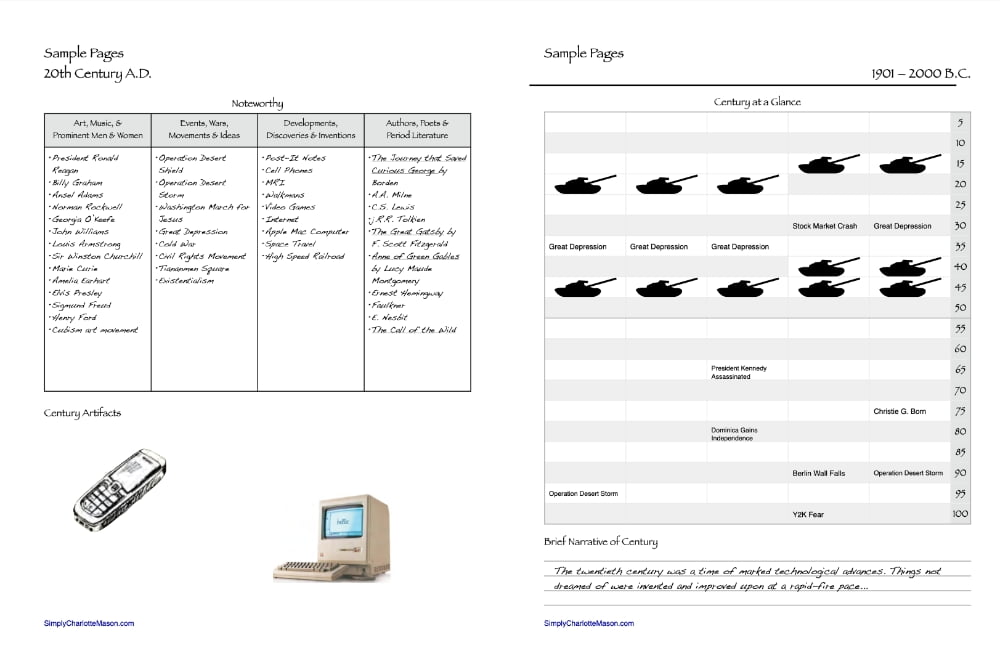
You can organize the people and events in each century by category; for example, notice the entries under Art, Music, & Prominent Men and Women; or Developments, Discoveries & Inventions during the 20th century.
You can also encourage your student to sketch artifacts from that century, either from a book or perhaps a museum visit.
A place for a brief overview narrative of each century is another way to level up.
And a Century At a Glance table can add a lot to your Book of Centuries. In this table, each box stands for one year in that century. You can see that the 20th century starts with 1901, so simply count each box across the top row: 1901, 1902, 03, 04, 05—and there is a handy tracking number over to the right to help you find years quickly on that table. (Just a reminder that B.C. tables will be the opposite, because you will be counting down through the years.) With this table you can enter key events and see how they relate to each other over the course of the 100 years. For example, notice the tank icons for World War I and again for World War II, with the stock market crash and Great Depression in between.
You can also see that the owner of this Book of Centuries (Christie G.) entered her birthday year on the chart. And that’s great. This is an opportunity for your student to make personal connections with history and create a book that reflects her individual learning.
And that’s what a Book of Centuries is all about: making a personal relation with history and providing a place to record that individual relationship.
Simply make entries as you read about various people or events. That’s all you have to do. Your Book of Centuries will keep everything organized and help your student discovery how history falls into place across the centuries.
Podcast: Play in new window | Download
Podcast (podcastv): Play in new window | Download