Free shipping on USA orders over $129!
Today, we’ve got some really practical tips to help you with nature study. Karen Smith is joining us to discuss: How do you go about observing in nature study?
Sonya: We often say observe all you can, but you shared in a session at our retreat recently some real, practical tools to help us walk through that observation time, questions we can ask and steps we can take. So I really wanted you to share that with everybody, if you will.
Notice, Think about it, Ask questions, and then Reflect on what you have observed.
Karen: There are four steps to helping your children and yourself learn how to observe better in nature. And those are: Notice, Think about it, Ask questions, and then Reflect on what you have observed. Let’s take those one at a time.
Sonya: Notice, Think, Ask, Reflect. Okay, Notice.
Notice
Karen: Notice what you can about whatever object you’re looking at in nature. That could be a leaf, it could be a tree, it could be a flower, it could be maybe a bird at your bird feeder, anything. It could be an insect. Tell what you notice out loud so that you remember, “I noticed a robin at my bird feeder eating bird seed.”
Sonya: To me, this step number one is almost as far as we often get. Just noticing. But I remember in another session you talked about using all the senses you possibly can for that noticing, so that’s where the senses come into play.
Karen: That can come into play there. The other thing is, if it’s an object you can hold, you can move it around. So maybe it’s an insect on a plant, or a rock you’re holding in your hand; look at it from different perspectives underneath, or above, or from the other side so that you see more of it than just that one observation.
Sonya: You could even do that with something that is larger like a tree. You could move to look from a different perspective as well.
Karen: Yes. Or just like an insect on a flower. You might not want to touch or pick up the bumblebee on the flower, but you can move around that flower and observe it from other directions. So do that. That’s important.
Sonya: So that’s Notice. Now we’re going to get into what else you can do. Because like I said, so often you end with Notice.
Think
Karen: Yes. Now the Think part is think about: What does that object remind you of? What does it look like to you? Now that could be something like you’re looking at a leaf and you notice that its shape is like a mitten. It reminds you of that and that gives you a connection to it. So when I see this leaf again, “Oh, it’s mitten-shaped.” I’ve observed that before. So it could be another object, or it could be another leaf that you’ve seen. Or in the case of an insect, it could be another type of insect that you’ve seen. The new one reminds you of that one. There are some similarities there, so that’s what you’re thinking about. You’re associating it with something that you know and there’s a connection. Now you can ask questions about that object.
Ask
Sonya: That’s the third step, asking questions.
Karen: And these are the typical Who, What, Where, When, Why, and How questions. You don’t have to come up with a question for every one of those, because sometimes they won’t apply. But the idea is to learn what you can about the object by asking those questions, as many as you can. So maybe you’ve seen a nest. Well, who built that nest?
You might have to observe for awhile to see what birds come back to that nest. Or you might just have to make note of the nest material and how it’s made and where it’s at so that you can go look it up in a field guide or online and see what type of nest it was because all the birds make different nests. That’s part of your observation.
Sonya: Now I heard a couple other questions when you said what it’s made of.
Karen: So that would be the next one. What is the nest made from? Did the bird use mud, grass, twigs, string, horse hair? There are all sorts of things that birds use for nesting material and those are clues to again, “Who made this nest?”
Sonya: We’re learning more about it.
Karen: We’re learning about how it is made. Whose is it? What is it made from?
Sonya: And what is it made from? Who, What, now Where.
Karen: Where. Where is the nest located? Is it located high up in a tree? Is it on the ground? Is it in a bush?
Sonya: Is it in a drain pipe? We were on the road the other day and we stopped at a fast food place. It had drain pipes up above with holes in the drain pipes. And this little bird, I think it was a sparrow, was flying there and it had what looked like a piece of hay, just a a small piece of hay in its mouth. It just disappeared into that little hole. Then it came back out without the hay like it was building a nest up there.
Karen: You’ll often see them on the signs that are on stores with the big letters that they have. Those are not flat and birds will often build on those. So, “Where is it built?”
Sonya: “Where’s this nest?” So that’s Who, What, Where, now When.
Karen: When was the nest made? Now, you might not know. If you find it in the fall after the leaves have come off the trees, you might not know when that nest was made. But if things fall into place that you see a robin building a nest, you can observe and watch when it’s made. You can record that in your nature journal or on your calendar. The robin began building this nest on this date, and finished the nest and laid the first egg on this date. So you have that timeline and that’s learning how long it takes a robin to build a nest. “Well, I’ve observed it this one time. I’ll watch again and see if that’s the same next time.”
Sonya: And if you find that empty nest in the fall, you might make a note to start watching that location in the early spring, and see if you can find a bird creating a nest there. That’s another potential long-term nature study that we’ve talked about in other episodes. Those long-term nature studies can spring from this observation.
Karen: Oh yes.
Sonya: So that was the When. So Who, What, Where, When, now Why.
Karen: Why. Why was the nest made? Well, a nest is usually made so the bird can lay its eggs and raise its family. Not always though, the sparrow you mentioned earlier — they build nests all the time. They just do that. They’ll stuff any cavity they can find with nesting material. But usually a bird is going to build a nest at a specific time, for a specific purpose, which is to raise their family. But “Why?” is a question that you can ask about your object.
Sonya: Young children will probably come up with a lot of Why questions. Now, How is the last one.
Karen: How was the nest made? Did the bird weave the material together? Did the bird use mud to stick it together? Some birds nest on the ground, so maybe the bird just found a clump of rocks and laid the eggs on those. That’s part of how was it made. Every bird is different.
Sonya: Those are great questions. I can see how we’re going so much farther into observing nature for ourselves than just the Notice. So we’ve noticed, we have thought “What does this remind us of?”
Karen: We thought about it.
Reflect
Sonya: And now we have asked these questions. And then the last one was Record?
Karen: Reflect. Reflect on what you have observed. That is when you do record your observations. Whether you write them down, draw them, do both, or you just state out loud what you observed.
Sonya: Put it in your own words.
Karen: Put it in your own words. Because that’s how you’re going to remember it, when you do something with it. You reflect on it. “What did I learn with my observations today?”
Sonya: Those are great steps. Did you come up with those yourself?
Karen: I did not. I do them naturally on my own, but I saw them in a book and I simplified what was in the book a little bit. But I got those ideas from John Muir Laws.
Sonya: This book right here. The Laws Guide to Nature Drawing and Journaling by John Muir Laws.
Karen: Now the first part of the book covers what we just went through and more. Then the last part of the book covers how to draw different objects in nature. So if you need drawing instruction or you like that sort of a thing, that part of the book can be useful also.
Sonya: I know he also has some great free downloads on his website. With good tips too. But this is gold. These four steps. I can see how.
Karen: And you can remember those four steps. Notice, Think about it, Ask questions about it, and Reflect on what you learned. Four simple steps.
Sonya: But it makes things go so much deeper than just observe. It gives you a little framework to work through. I love that. All right, so do we want to try one in real time here?
Karen: Yes.
Applying the Steps with a Nature Object
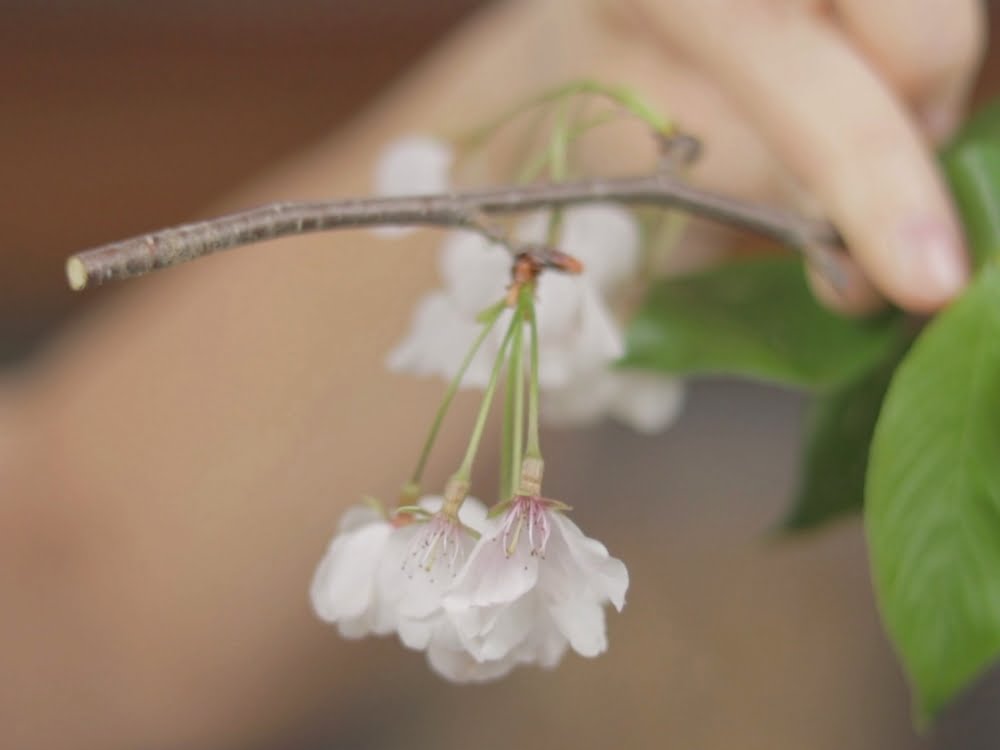
Sonya: All right. We have this little nature object from my front yard and let’s see if we can walk through the four steps.

Karen: So the first step is Notice what you can about it. What do you notice about the leaves?
Sonya: Number one, I notice that this is a twig off of a tree. We need to start there. Especially for people who are listening and not watching this podcast. That would help them know that this is not a little bunny I’m holding. All right. The leaves, some of them are baby tiny leaves. I just turned it over because you said look from different perspectives. There are some little baby tiny leaves that aren’t quite unfurled yet. And there are some medium-size leaves and there are some large ones. They feel a bit waxy and there is a very little bit of serration around the edges. The veins on the leaves look like they’re alternating from that middle line.
Karen: The leaves are lighter on the underside than on the top side.
Sonya: Oh yes, they are lighter green, and the leaves coming off the twig are also alternating. They aren’t coming off together at same point.
Karen: Good observations.
Sonya: Thank you. Then at the bottom, closest to where it came off the trunk or the branch, we still have these two clusters of blossoms. And those have like little stars underneath. There are white blossoms with the purplish, I’m going to get real technical here, stringy things in the middle.
Karen: Oh that’s good. (laughs)
This is about observing, not learning terminology.
Sonya: Thank you. And holding up those delicate white petals, there’s a like a green star underneath that’s holding them up. But they’re on the ends of these long dangly stems, little clusters, lots of clusters from, oops. Somebody just fell off. Hang on there guys. Lots of clusters coming off of this one bit. I’m using all these wonderful technical terms (laughs).
Karen: That’s okay.
Sonya: I’m feeling a bit foolish because I don’t know them.
Karen: That’s okay that you don’t know them, because this is about observing, not learning terminology.
Sonya: Thank you. That makes sense.
Karen: So you are doing well.
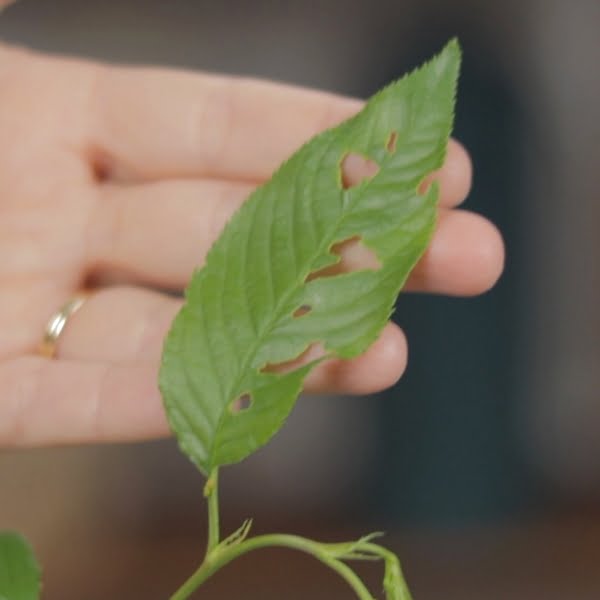
Sonya: I also observe that this leaf has been chewed on by an insect.
Karen: Yes, somebody was having a meal.
Sonya: Breakfast.
Sonya: Oh, look at that one. So whatever this is, this type of leaf, there is some kind of insect that really likes it. This one really liked this partially grown leaf. It must have been very tender so it went for that. All right. So we’ve observed, that’s the Notice part. And we used several senses. It does have a beautiful scent. The blossoms are lovely. I can’t describe them. How do you describe a scent? You can only compare it to something else. Anyway, yes. So I looked, I felt it, I smelled it. I’m not going to taste it and listening to it, that’s not going to glean me too much there but I used as many senses as I could. I noticed. Okay. Next.
Karen: Think about what it looks like. Do the leaves remind you of some other object or some other tree that you have observed or the blossoms or the color of the bark, anything about it? Does it remind you of something else?
Sonya: The leaves kind of remind me of the little fig tree that I have at my house. I had one for many years and they’re kind of that same shape.
Karen: Yes, fruit trees have similar shaped leaves.
Sonya: That teardrop shape. So it reminds me of that. Then the blossoms are white with a little pink in the middle, but the clusters remind me of, I want to say bleeding heart, but that’s not the right type of flower. There’s another flower that has the little white dangly downs to use the correct terminology. (laughs)
Karen: Oh the correct terminology. Of course.
Sonya: So there you go.
Karen: You said this is a type of cherry tree from your yard?
Sonya: Yes, it’s a Japanese Cherry tree.
Karen: You know that. And looking at the stems and how the flowers are formed you can almost see how the fruit will hang on there. And if you’ve seen cherries on the stems —
Sonya: This looks just like that. Where that little white petal is, that’s where the cherry would be. Oh yes of course. You’re so clever.
Karen: How about if we move on to asking the questions?
Sonya: Okay let’s do. Who planted this? I do not know.
Karen: Somebody in the past. That’s all we can tell about that. And that’s okay if you can’t answer all the questions. That’s not the goal. The goal is to learn what we can, not check off boxes.
Sonya: Who, What. It is a Japanese Cherry Tree.
Karen: Yes. And you know that because you’ve identified it before.
Sonya: Because we’ve lived here for 22 years and eventually I figured out I should get to know what kind of tree this is.
Karen: But if you didn’t know what it was, you could use a field guide or a tree key to look it up. If you couldn’t find it in that, and it’s an ornamental tree in your neighborhood, you might go to a garden center or a plant nursery and see if you can find that tree.
Sonya: I could take a picture of this and show it to the experts there and see if they could help me with it.
Karen: Absolutely. Or your county extension office sometimes is a good source too, because they’re supposed to know everything about your area.
Sonya: Okay. That’s Who, What, now Where.
Karen: Where?
Sonya: Front yard, but there’s two trees right next to each other and they’re two different types. So I have to know which one it is that is the cherry tree. And I know where it came from, yes.
Karen: And it grows in your neighborhood in Georgia?
Sonya: You see the blooms all over the place. Yes, here in Georgia. I don’t know if you have these up in Illinois.
Karen: I don’t know if we have that kind of cherry. We do have cherries. But maybe not this particular one.
Sonya: Okay. That’s the Where, Who, What, Where, now When.
Karen: When. Now that could be, “When was it planted?” That could be, “When did the blossoms first appear?” We can tell, from looking at this, that the leaves came out before it blossomed because the leaves are full and the blossoms are still blooming. If it bloomed before the leaves came out you would see the flowers but not the leaves or just little leaves starting to emerge. So those are important questions to ask too.
Sonya: That’s the When.
Karen: That’s the When. How, you could ask, “How does it grow?” You’ve already mentioned that the leaves are alternating and even the veins on the leaves, you’ve made observations on that. Any of those could fall under How. For Why, “Why did it grow here? Why does it leaf out before it flowers?” We might not know the answers to those questions, but we can still ask them and see if we can figure it out or even make some guesses. Maybe, in this case, the leaves come out first because what’s needed to pollinate the flowers needs the leaves.
I don’t know if that’s true, but that would be an observation that you could make. You could jot that down in your nature journal and as you continue observing those long-time nature observations you could see if you were right or not.
Sonya: Or you could even just jot down your question and see if you can find the answer later on.
Karen: So we went through the questions, now we’re to our final step: Reflect on your observations. “What did you find out about this twig?”
Sonya: Then I would write those down in my nature notebook, or I would draw a picture of the twig?
Karen: You can write them, you can draw. You can write your observations, or you can draw it and talk about it with somebody, or just even speak it out loud because that verbalizing it, whether it’s to somebody else or just to yourself, helps you to remember also.
Sonya: Great, very helpful. So to recap, we Notice what we can using as many of the senses as possible. We Think about what it reminds us of and try to form a connection with something else already in our heads. We Ask the questions who, what, where, when, why and how or as many as are applicable. And even if we can’t answer those questions, we can jot down what the question is and keep looking for an answer.
Or we can jot down what we think the answer might be and confirm or clarify it later. That jotting down leads to the fourth step, which is to Reflect and record our observations. Now we have so many observations, but if you had just said, what do you notice about that? I would’ve stopped there. But when we asked those questions, it got so much richer and deeper. And it’s not that hard to remember those.
Karen: No, even you did it. (laughs)
Sonya: Yeah, which is saying something. That’s great. Thank you so much.
Take these ideas with you!

Download this free printable bookmark with the four steps to a great nature study. Tuck it in your nature journal to guide your next nature study time!
Podcast: Play in new window | Download
Podcast (podcastv): Play in new window | Download