Free shipping on USA orders over $129!
DIY—Do It Yourself. For some of you, those initials generate great excitement! Images of potential projects arise in your imagination and you can hardly wait to dive into a new one.
Others of you get tired just looking at those initials. To you, DIY stands for a pile of decisions and precious time that you would rather spend doing something else.
It’s just natural; we’re all different.
And those two attitudes seem to cross over into planning for homeschooling too. Some of you much prefer having lesson plans that are already put together, so you can just open the book and go. But some of you like to build your own lessons, choose your own books, and put together your own custom plan.
This post is for you DIYers. For the rest of you, if you want open-and-go plans, we have them available. Feel free to put your feet up and follow this link to learn more about our ready-made lesson plans.
But if the thought of putting together a plan for yourself excites you, keep reading. What I’m about to describe has helped hundreds of homeschool moms build their own customized Charlotte Mason education.
We’ll be looking at five steps. The key is to take one step at a time and not to skip any of them. Many of the moms who have come to me for planning help over the years realized that their previous planning attempts floundered because they were trying to jump too far too fast. Once they saw all five steps in the process, they finally got all the pieces to fit together and walked away with a plan that they could use—a plan that was designed just for their family.
You see, every family is different, so every plan will be different. Beware of trying to stuff your unique family into someone else’s plan or schedule. Of course, you can adopt parts and collect ideas from others’ schedules, but in the end your family needs a plan that will suit this season of life, a plan made specifically for you and your children right now.
Are you ready? Here are five steps for planning your Charlotte Mason education:
- The Big Picture
- Your Year
- Your Term
- Your Week
- Your Day
Let’s walk through them one by one.
Step 1: The Big Picture
Before you get into the nitty gritty of scheduling particular books, you need to take a step back and look at the big picture. What is it that you want to accomplish by homeschooling? What is your goal for your student?
That may seem like an unrelated philosophical question, but your answer to it will affect your plans. For example, if your goal is to prepare your child for an advanced mathematics degree, that goal will affect the books you choose and how much time you spend on math during the week. If your goal is to nurture your child’s musical talent, that goal will show in the way you choose to schedule your terms and each day’s routine.
So right from the start, try to determine what your goals are for your homeschooled child. Your goal might be different for each child, depending on each child’s needs and special interests. Or you might want to write down a set of general goals that you want to emphasize with all the children. It’s up to you, but write down your goals first.
After you determine what is important to you, you’ll need to find out what is important to the authorities. Are there any legal requirements in your area? Are there any subjects that you are required to teach or any subjects that are required before your student can graduate? Do the research on those areas and make sure you comply with the laws in your area.
Along those same lines of planning ahead, if you have a middle schooler or a high schooler you may also want to check out college admission guidelines (if college is one of your goals). Each college will probably have various specific requirements, but many of them will have similar general requirements — like three or four years of science, three or four years of math, two years of foreign language, or things like that. (Those of you with young children may want to wait a few years before doing this research; the guidelines might change between now and then.)
After you have figured out what’s important to you and what’s important to others, you’re ready to outline a 12-year overview. Just list all the school subjects you can think of. Since this post is about planning your Charlotte Mason education, you’ll want to be sure to include CM-specific subjects, like picture study, dictation, and nature study. Then decide which subjects you will teach in each grade. (You could get a sheet of graph paper or use your computer’s spreadsheet and put the subjects down the left column and the grade numbers across the top. Just put an X under each grade and across from each subject that you want to teach in those grades.)
(I’ll throw in a few sample charts to illustrate what I’m talking about. The charts that are included will not be complete; they are included simply to give you an idea of how they might look.)
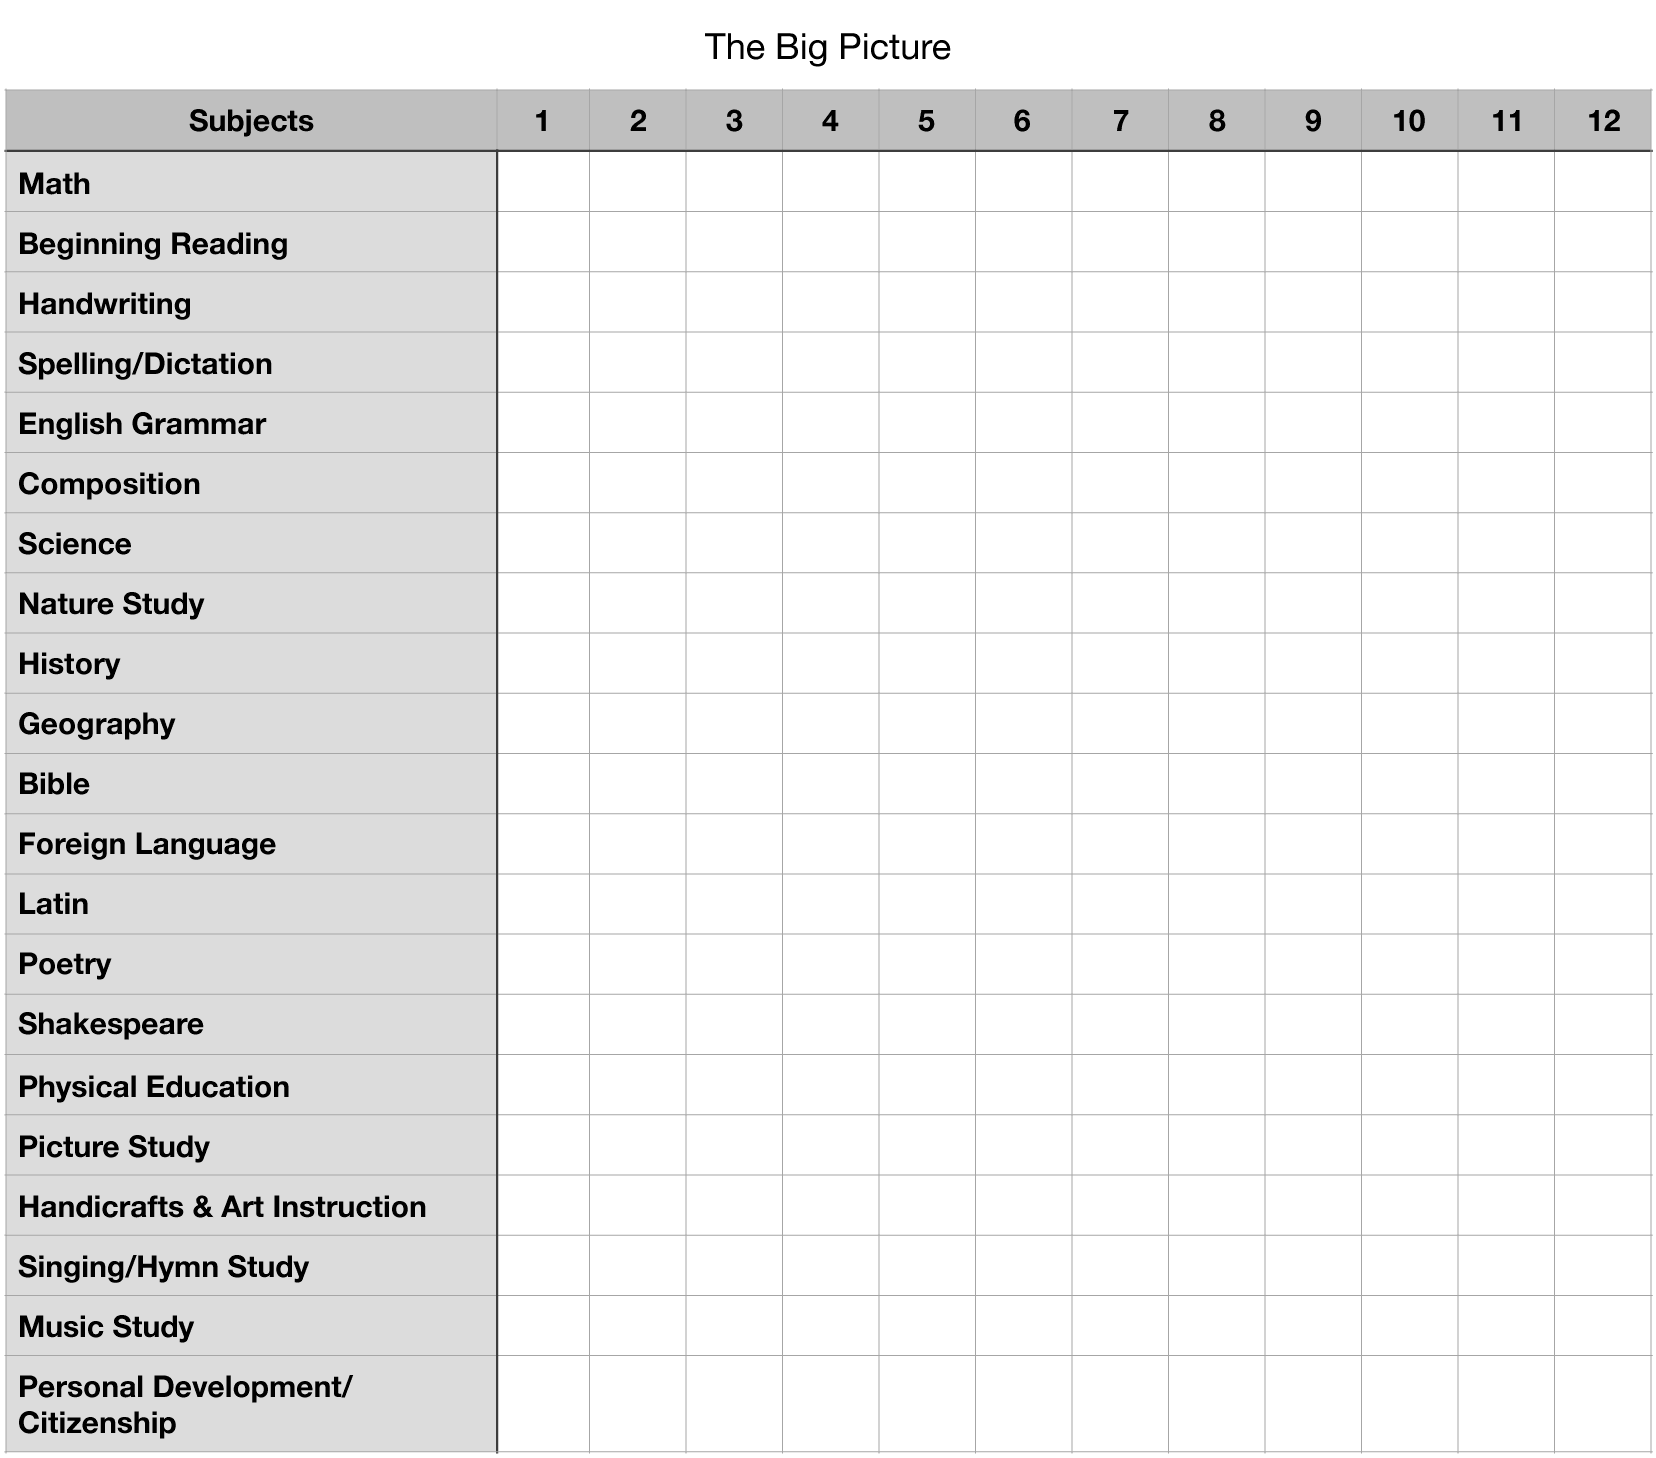
If you’re following Charlotte’s big picture, you’ll postpone formal grammar lessons until at least grade 4, you’ll do nature study in every grade, and you’ll start dictation around grade 4. Do you want to do Shakespeare every year starting in grade 4, as Charlotte did? If so, mark it down. If not, mark which years you want to include it.
Remember, the big picture is not the step in which you have to decide exactly which composers, time periods, and science topics you’re going to teach each year. The big picture is just to determine which subjects you plan to teach in which grades. That’s all.
When you’ve finished outlining the subjects for each grade, you’ll know where you’re headed and the general direction you’re going to take to get there. Then you can start zooming in on some specifics in Step 2.
Step 2: Your Year
When you begin to plan for a year, look at your 12-year overview and locate just the grade levels you will have going this year. See which subjects you have planned to teach in those grades. For example, if you will have a child in grade 3, grade 5, and grade 8, look at the subjects you have decided to teach in those grades.
I like to combine all my children together for as many subjects as possible. It saves me a lot of time, and the children gain the benefit of learning from each other. As you plan, you’ll probably want to organize your subjects into several lists: one for subjects you’ll do all together as a family and one for each child’s individual work. This chart will give you an idea of what I mean.
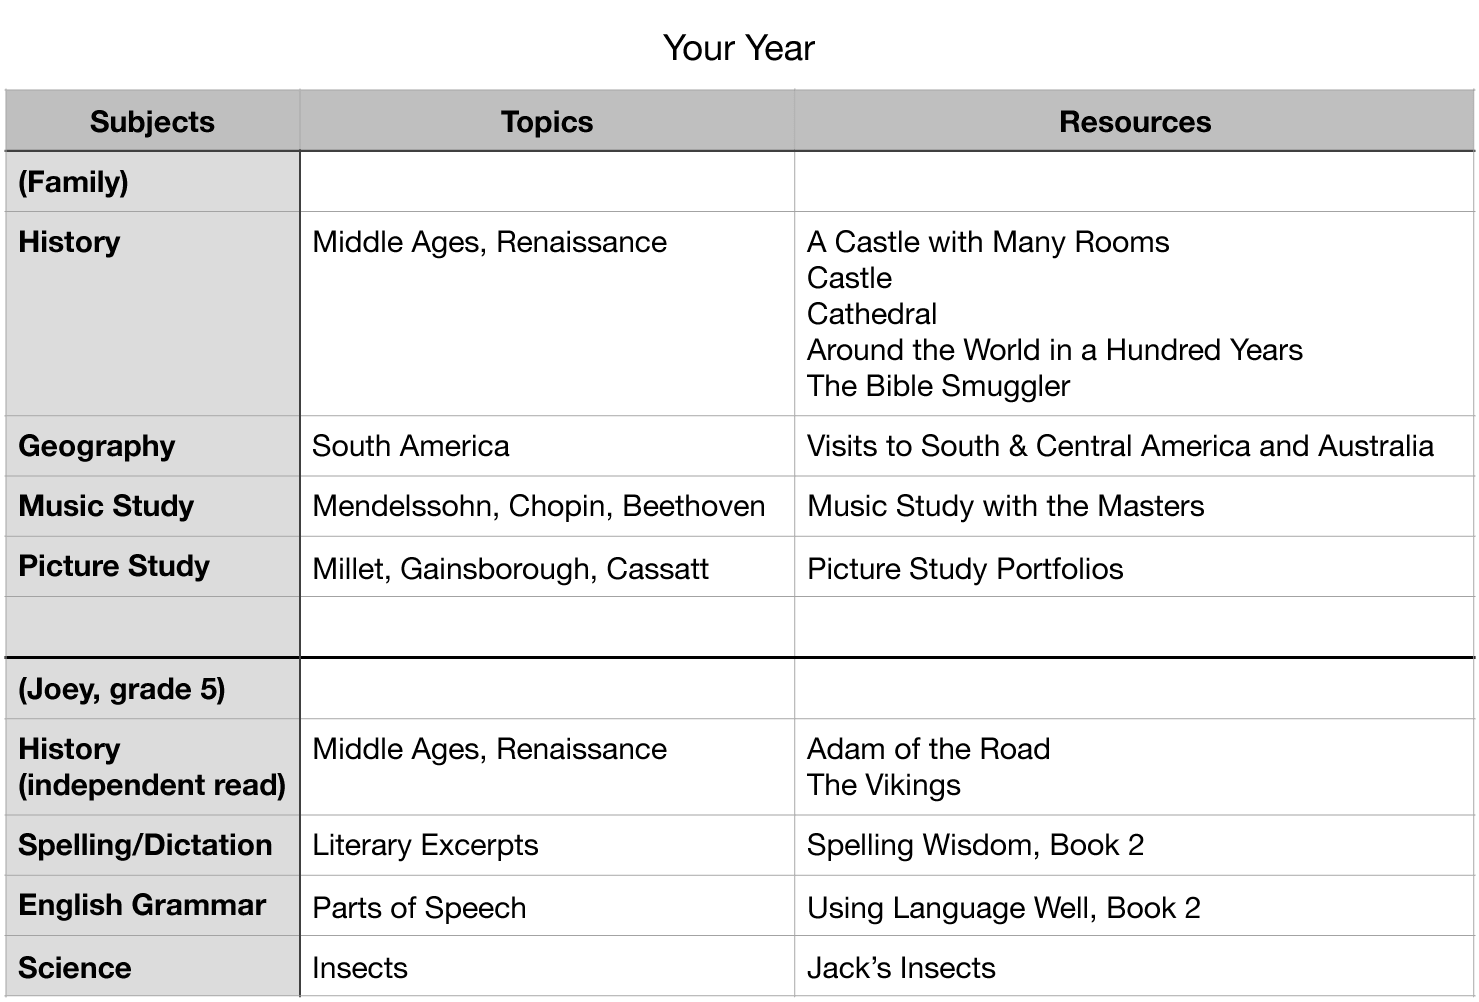
Next, on those lists, add the topics you want to cover in each subject. Let’s say you have history on your Family list for this year. That’s great. Which time period are you going to study? That’s your topic. Or maybe you have picture study on your Family list. Which artists will you cover? Those are your topics. So add your topics to your subjects.
Then comes the fun part: resources! After you know which topics you want to cover this year, you can select the resources you want to use to teach those topics. If you are going to focus on, say, the Middle Ages for history, make a list of books, audios, and other resources that you want to use. (Tip: You may want to put some Middle Ages books on your Family list and other Middle Ages books on your older children’s lists for them to read independently in addition to the Family books.)
As you look for resources, keep in mind the goals that you determined during the Big Picture step. How important a topic is to you will affect which resources you choose to use. If you simply want to introduce a topic, you will select a resource that doesn’t go into a lot of depth; but if you want to dig deeply into a certain topic, you’ll pick the resource that gives all the details and might take a little more time to cover.
The SCM Curriculum overview chart has links to our favorite lists of books for the various time periods and resources for enrichment subjects. Feel free to scour those lists for book suggestions. You can also search the CM Bookfinder for suggestions from other homeschool parents. In that free database you can search by topic, time period, key word, author, grade level, and more.
Once you have your resources selected, you can move on to planning your term.
Step 3: Your Term
One of the most common problems moms have when planning is trying to jump directly from their Year Plan to their Daily Schedule. I’ve found it a lot easier to make that move in smaller steps rather than one big jump.
First, break up your year into three sections. Charlotte Mason called them “terms.” (If you would rather call them something else, that’s fine. At least you’ll know what I’m talking about when I refer to terms.) Since most school years cover about 36 weeks, it’s easy to divide those 36 weeks into three 12-week terms.
Grab a sheet of paper and make three columns on it; label them Term 1, Term 2, Term 3. Next, write down each resource’s name and make a note of how many divisions (chapters, lessons, readings, etc.) you want to use from it during the year. It might look something like this.
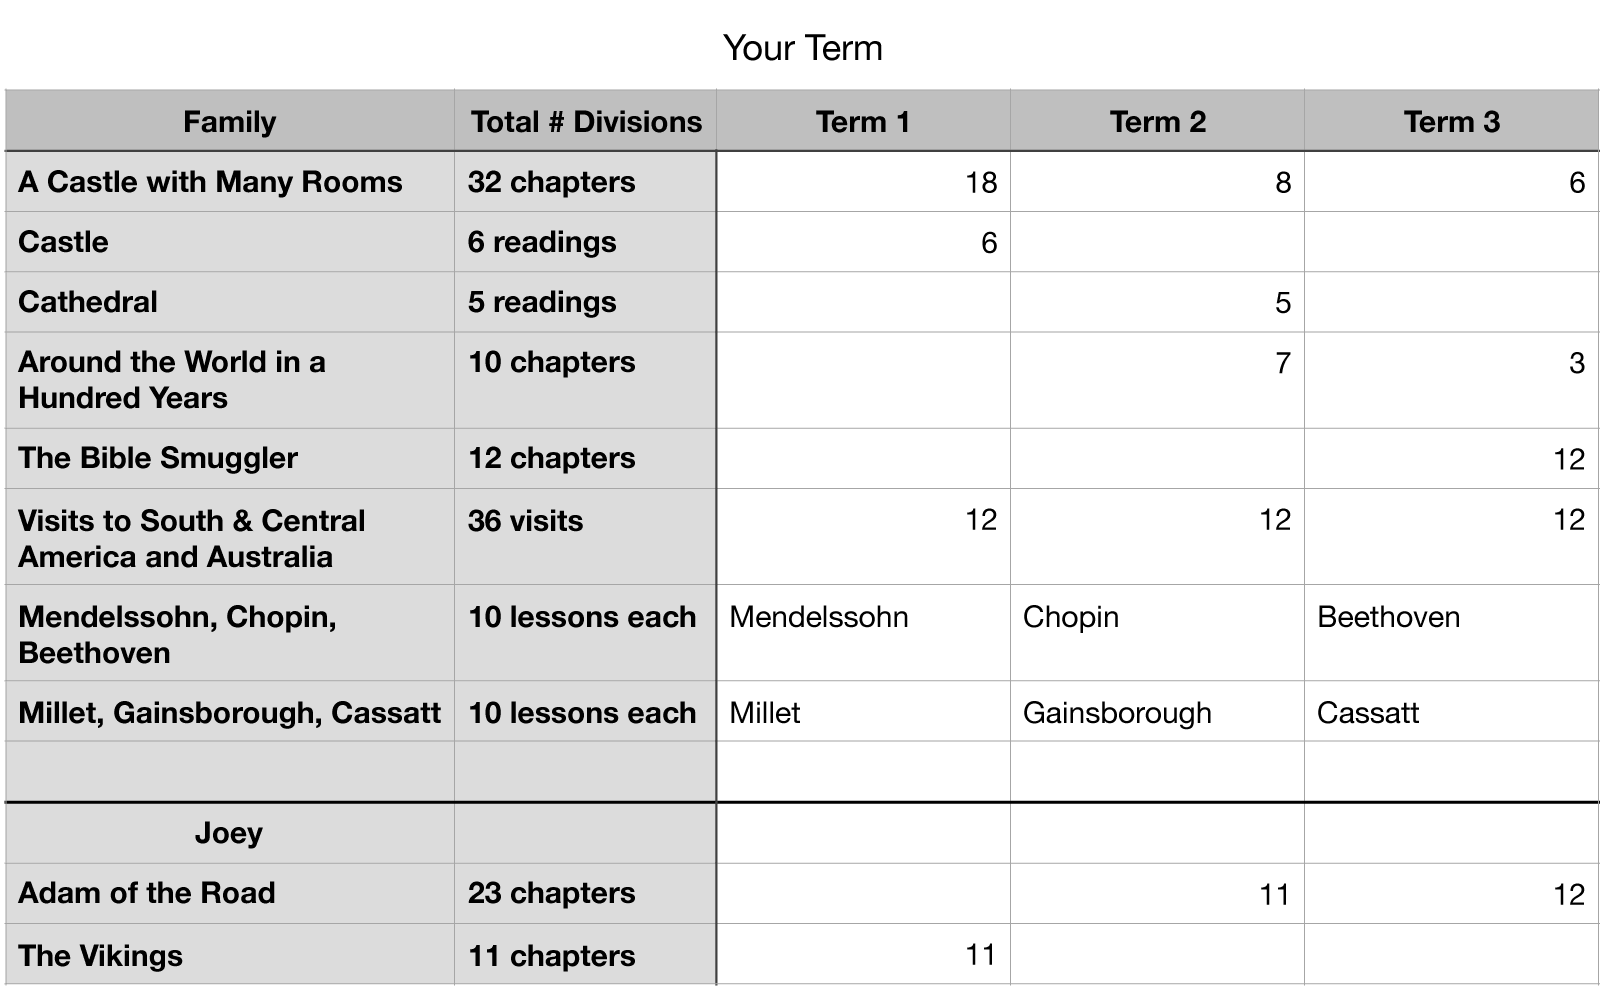
If you want to complete all of that resource’s divisions during term 1, write that total number in the column under Term 1. If you want to split it out evenly between term 1 and term 2, write how many divisions you want to cover in each term’s column. If you want to spread out that resource and use it all year, split its divisions evenly between all three terms.
This step of the planning process is not difficult, but doing it can give you a great overview of how you plan to use your resources during the year and how you can break that year into manageable chunks. When you look at your plans at this stage, you can get a feel for whether you are overloading one term or slacking off in another term.
Planning your terms also lays a great foundation for figuring out how many days per week to do each subject. That’s the next step.
Step 4: Your Week
Some Charlotte Mason subjects work well if done once a week. Those subjects are usually
- Picture study
- Music study
- Nature study
- Handicrafts or Art instruction
“But how many days per week should I do science?” and “What about history?”
Here’s how to figure out the answer to those questions. You could try to follow exactly the schedules that Charlotte used in her classrooms, doing each subject the same number of days that she did. But please don’t feel handcuffed to her six-days-per-week plan. You do not have to replicate her schedule in order to give your children a rich CM education. The atmosphere of your home is important, and you can use Charlotte’s wonderful principles and brilliant methods in a schedule that fits your unique family best during your current season of life.
So grab that list or chart that you made in Step 3 and look at what you wrote down for just Term 1. We’ll concentrate on one term at a time.
Look at all the resources you have listed for history during that one term. Total up the number of divisions (chapters, lessons, modules, etc.) that you have written down for that term in all of your history resources.
So, let’s say you’re planning Term 1 and you have three history books listed in that term. Calculate the total number of chapters in those books. Let’s say there are 12 chapters in one book, 15 in another, and 9 in the third book. You would add them together and get 36 chapters in all for history.
Now all you need to do is divide that total number of chapters by the number of weeks in your term (12 weeks). The answer would be 3. And that answer tells you that you need to do history three times each week (reading one chapter each time) in order to complete all the chapters you have listed.
You can do the same thing for each of the other subjects: calculate each subject’s total divisions and divide that total by 12—the number of weeks in the term. Your answer will tell you how many days per week to do that subject. (Hint: If your answer is not a whole number, round it up to the next whole number (for example, 3.62 would become 4, or 4 days per week, and 0.3 would become 1 day per week).
Once you know how many days per week you need to do each subject, all you have to do is decide which days of the week to do them. The Weekly Schedule chart on our site will help you organize that part. Print the chart and write in any outside commitments you have first: co-ops, recurring doctor appointments, church activities, etc. When you have those outside commitments visually plugged in, it is easier to fit your school subjects around them and avoid overloading one particular day of the week. If you have determined that you need to do history four days per week, write that subject under four of the days. Picture study is usually one day per week, so pop that in under one of the days. You can choose which day works best for your family. You get the idea. Here’s a sample.

Do the same thing for all your Family subjects and Individual subjects (math, language arts, and upper level sciences). Don’t worry about the order in which you list them under each day; we’ll tackle that in the next step. Right now just get the subjects spread over your week in a way that will help you accomplish your selected resources without overloading one particular day.
Once that step is done, you will find it much easier to plan your daily schedule.
Step 5: Your Day
Before you start arranging your daily schedule, take just a minute to consider your comfort zone. Are you the type of person who likes to run her day according to the clock? Are you most comfortable knowing exactly what time you should move on to the next item of the day? Then your comfort zone is using a timetable to schedule your day. A timetable looks something like this: 8:30 Math, 8:50 History, 9:15 Geography, etc. Charlotte Mason used a timetable approach in her schools’ classrooms.
If, however, running your day by the clock stresses you out, your comfort zone is probably using a time-box approach instead. (Don’t feel guilty; Charlotte didn’t have to deal with new babies, laundry, and preschoolers disrupting her school day.) With a time-box approach, you simply divide your day into blocks of time (called time boxes) and determine which subjects you want to accomplish during each block. For example, you might have a “Before Breakfast” time box in which you want to have the children do their morning chores; a “Between Breakfast and Lunch” time box in which you want to accomplish history, math, picture study, copywork, and typing; an “After Lunch” time box, etc.
(And in case you’re wondering, yes, you can still do short lessons with a time-box approach. Simply start the timer when you’re ready to begin the lesson within that time box. When the timer dings, that lesson is done. The main difference is that it doesn’t matter whether you start that lesson at 9:30 or 10:08; you simply make sure you do it some time during that time box.)
Once you have found your comfort zone, make a simple chart with your students’ names across the top and your timetable or time boxes down the side. Maybe something like this:
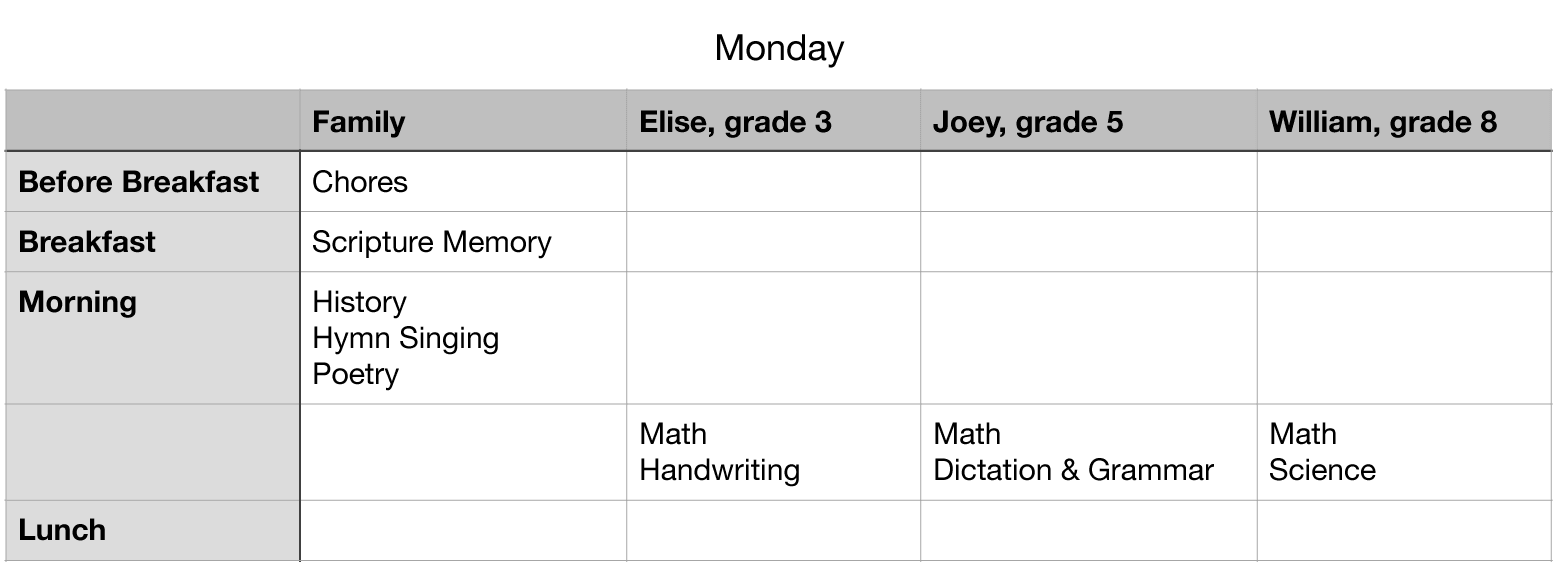
Look at your Weekly Schedule that you created in Step 4. All you have to do is transfer the subjects listed under Monday to a Monday Daily Schedule, arranging them as you like. Then transfer Tuesday’s subjects to a Tuesday Daily Schedule, and so on until you have a daily schedule for each day of your school week. It’s up to you whether that schedule is laid out in 15-minute increments or flexible time boxes. Do what works best at this season of your family’s life.
One final tip: keep in mind that whether you use time boxes or a timetable, your students will find it easier to pay full attention if you put your subjects in a sequence that allows them to use different parts of the brain as they go through the day. Alternate a heavy-concentration subject with a lighter one; follow a word-heavy subject with a hands-on subject or art or math. That little technique will go a long way toward making your days run smoother.
And there you have it—planning your CM education in five steps. As with any DIY project, you don’t have to complete it all in one day. Take breaks between steps if you would like to. The Build Your Own Curriculum section on our website contains lots of free ideas, book lists, charts, suggestions, and links that will help as you walk through the process.
Here’s to a successful customized plan that will be a great fit for your family!
More Planning Guidance
The book Planning Your Charlotte Mason Education walks you through the entire process described above. Full of convenient, reproducible charts; sample schedules; and descriptions and topic ideas for each school subject, it’s the complete guide to creating your customized CM homeschool plan. Download a free sample in our store and get started with the Big Picture step.
Podcast: Play in new window | Download
Podcast (podcastv): Play in new window | Download
This was extremely helpful as a first year homeschooling mom! Thank you for all you do!
Golly, I’ve asked several homeschooling moms over the last few years how they put together curriculum and they either just buy preassembled curriculum, or they are unhelpfully vague. This is hands down the most encouraging explanation for me. How it allows me the flexibility of teaching what I feel it is time for without worrying I’m gunna forget to eventually get around to something obvious. This combines both my love for structure and my love for flexibility and going with the flow when needed. For the first time this seams feasible. Thank you so much for taking time to address this!